Adding Devices
EnterpriseAdd network devices to NetStacks manually, via CSV import, from SecureCRT sessions, or through NetBox sync for centralized inventory management.
Overview
Device management is the foundation of NetStacks. Before you can capture configurations, run templates, or connect through the terminal, every target device must exist in the NetStacks inventory. The inventory stores each device's connection details — hostname or IP address, SSH port, platform type, and credential association — so the rest of the platform can operate without repeated manual input.
NetStacks supports four methods for adding devices to the inventory:
- Manual entry — Add a single device through the Admin UI with full control over every field.
- CSV import — Bulk-add devices from a comma-separated file exported from spreadsheets, CMDBs, or other systems.
- SecureCRT import — Migrate session profiles from SecureCRT so you do not have to re-enter connection details.
- NetBox sync — Pull device inventory from one or more NetBox instances automatically, with filter-based device selection.
A single, accurate device inventory eliminates the spreadsheet sprawl that plagues most network teams. Every credential lookup, config backup, and automation job references the same device record, so changes propagate everywhere automatically.
How It Works
When you add a device, NetStacks creates a record in PostgreSQL that stores the device's connection parameters and metadata. Each device record includes fields for name, host, port, protocol, device type, manufacturer, model, platform, site, serial number, asset tag, tags, and custom metadata.
Device Record Structure
The core device model tracks both connection details and organizational metadata:
- Connection fields —
host(IP or hostname),port(default 22),protocol(SSH by default), anddevice_type(platform driver string likecisco_ios). - Credential association —
default_credential_idlinks to a credential in the vault, andsnmp_credential_idlinks to SNMP credentials for polling. - Source tracking — The
sourcefield records how the device was added (manual,csv_import,netbox), andnetbox_idstores the original NetBox device ID for synced devices. - Organizational metadata —
site,manufacturer,model,serial_number,asset_tag, andtags(JSON array) for filtering and grouping.
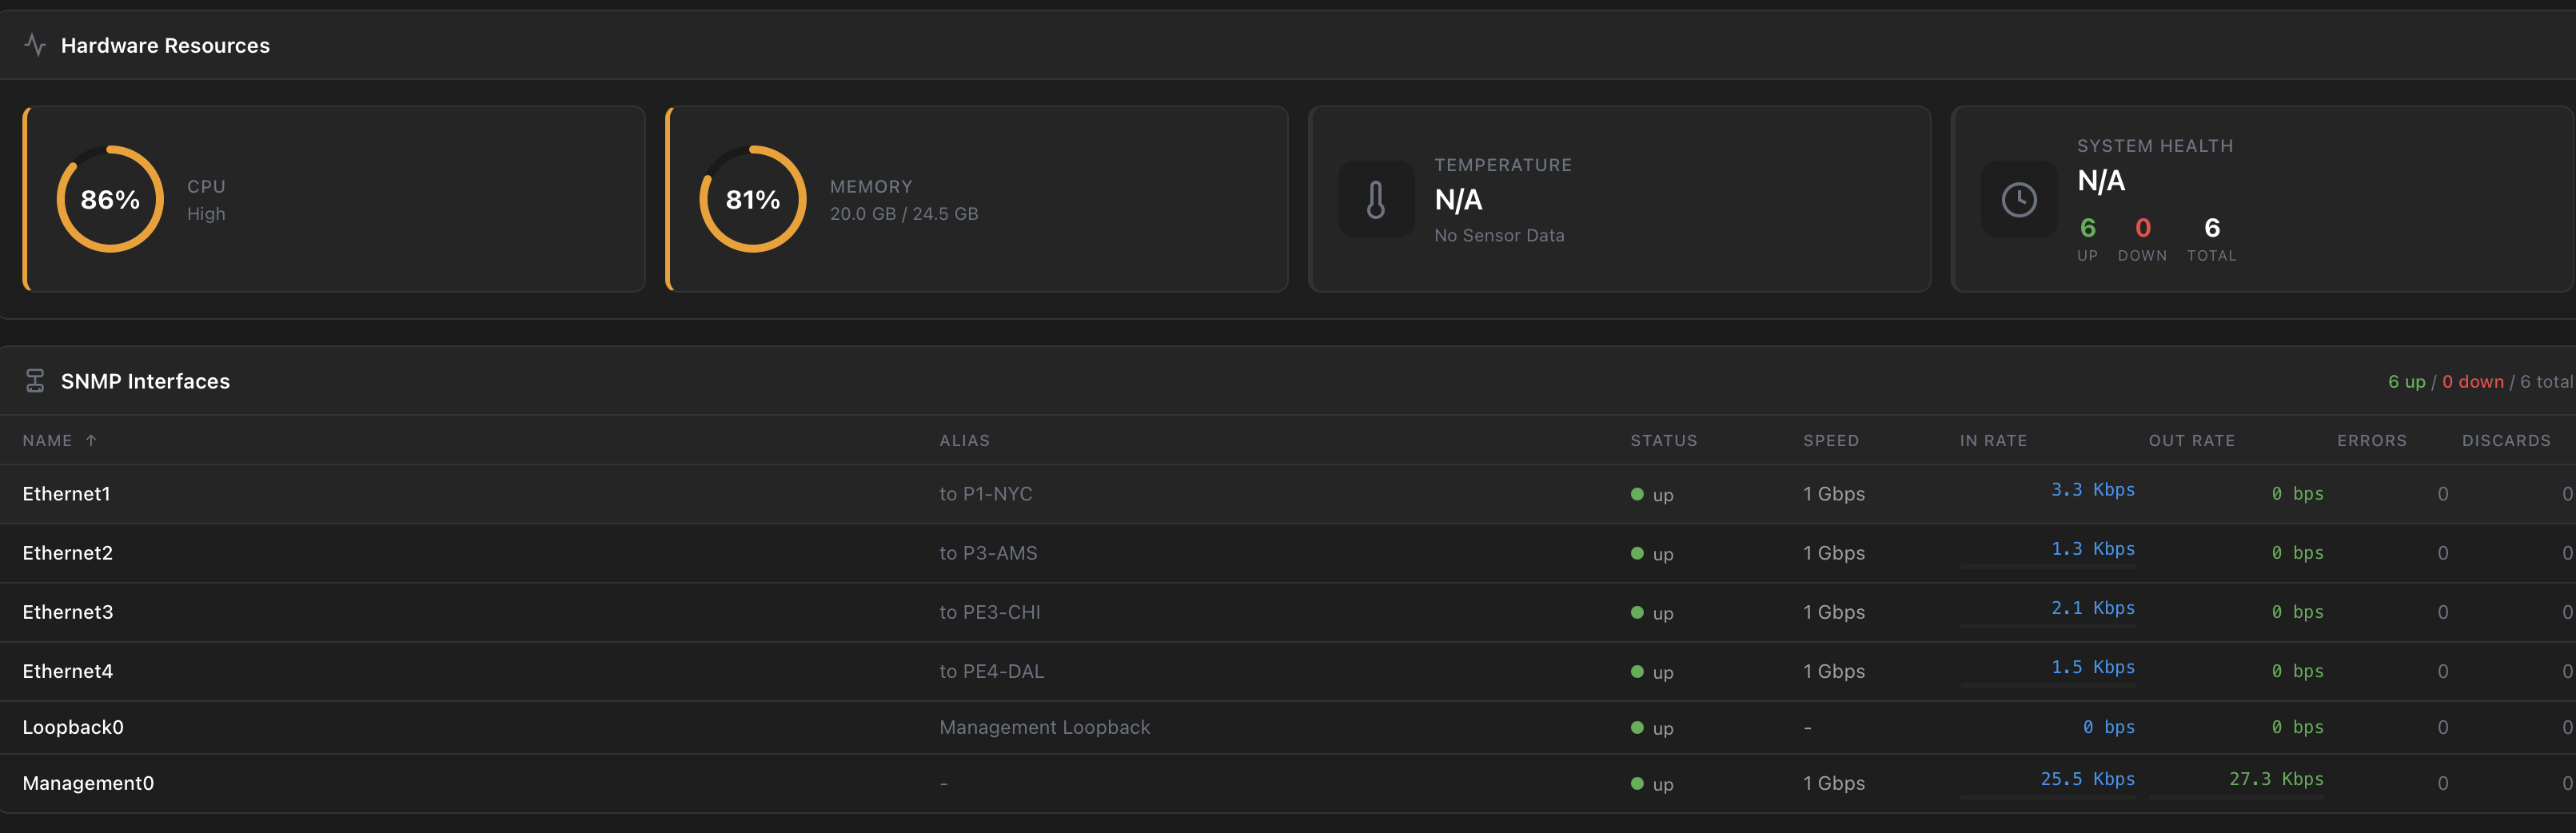
Hardware Resources & SNMP Monitoring
Devices with SNMP credentials display real-time hardware resource monitoring including CPU utilization, memory usage, temperature, system health, and interface status with traffic rates:
Credential Association
Devices are linked to credentials through the credential vault. When NetStacks connects to a device for config collection or terminal sessions, it retrieves the credential from the vault, decrypts it using the master key, and uses it to authenticate. Credentials are never stored in the device record itself.
Connect Commands
Each device can optionally store connect_commands — a list of CLI commands that the Terminal executes automatically after connecting. This is useful for devices behind jump hosts or those requiring an initial enable or system-view command.
Step-by-Step Guide
Manual Device Entry
- Navigate to Devices in the Admin UI sidebar.
- Click Add Device in the top-right corner.
- Enter the Name — use a descriptive hostname that includes the device function and location (e.g.,
core-rtr-01.dc-east). - Enter the Host — the management IP address or resolvable hostname (e.g.,
10.1.0.1). - Select the Device Type from the dropdown (e.g.,
cisco_ios,juniper_junos,arista_eos). - Set the Port if different from the default (22).
- Assign a Credential from the vault, or leave blank to assign later.
- Optionally fill in manufacturer, model, site, serial number, asset tag, and tags for organizational tracking.
- Click Save.
Use a consistent naming scheme across your fleet. A common pattern is function-location-number — for example core-rtr-01, dist-sw-03, fw-edge-02. This makes filtering and bulk operations much easier.
CSV Bulk Import
- Prepare a CSV file with the required columns:
name,host,device_type. Optional columns includeport,manufacturer,model,platform,site, anddescription. - Navigate to Devices and click Import → CSV Import.
- Upload your CSV file or paste the CSV content directly.
- Review the import preview — NetStacks validates each row and highlights errors (missing required fields, duplicate names).
- Click Import to create all valid devices. Failed rows are reported with row numbers and error messages.
SecureCRT Session Import
- In SecureCRT, export your session profiles to INI or XML format via File → Export Settings.
- In NetStacks, navigate to Devices → Import → SecureCRT.
- Upload the exported session file.
- NetStacks parses the hostname, port, and protocol from each session profile and maps them to device fields.
- Review the mapped devices and assign device types and credentials as needed.
- Click Import to add the devices.
SecureCRT import maps session names to device names and hostnames to the host field. Credentials are not imported from SecureCRT — you must assign credentials from the NetStacks vault after import.
Code Examples
CSV Import Template
A CSV file for importing a typical multi-vendor data center network:
name,host,device_type,port,manufacturer,model,site,description
core-rtr-01,10.1.0.1,cisco_ios,22,Cisco,ISR 4451,dc-east,Core router - East DC
core-rtr-02,10.1.0.2,cisco_ios,22,Cisco,ISR 4451,dc-east,Core router - East DC redundant
dist-sw-01,10.1.1.1,cisco_nxos,22,Cisco,Nexus 9300,dc-east,Distribution switch - Row A
dist-sw-02,10.1.1.2,cisco_nxos,22,Cisco,Nexus 9300,dc-east,Distribution switch - Row B
leaf-sw-01,10.1.2.1,arista_eos,22,Arista,7050X3,dc-east,Leaf switch - Rack 01
leaf-sw-02,10.1.2.2,arista_eos,22,Arista,7050X3,dc-east,Leaf switch - Rack 02
fw-edge-01,10.1.0.10,paloalto_panos,22,Palo Alto,PA-5260,dc-east,Edge firewall - Primary
fw-edge-02,10.1.0.11,paloalto_panos,22,Palo Alto,PA-5260,dc-east,Edge firewall - Secondary
wan-rtr-01,10.2.0.1,juniper_junos,22,Juniper,MX204,dc-west,WAN router - West DC
mgmt-sw-01,10.1.3.1,hp_procurve,22,HPE,Aruba 2930F,dc-east,Management switch
Add a Device via REST API
Create a device programmatically using the POST /api/devices endpoint:
curl -X POST http://localhost:3000/api/devices \
  -H "Authorization: Bearer ${TOKEN}" \
  -H "Content-Type: application/json" \
  -d '{
    "name": "core-rtr-03",
    "host": "10.3.0.1",
    "port": 22,
    "device_type": "cisco_ios",
    "manufacturer": "Cisco",
    "model": "Catalyst 8300",
    "site": "dc-west",
    "description": "Core router - West DC",
    "tags": ["core", "production", "west"],
    "default_credential_id": "a1b2c3d4-e5f6-7890-abcd-ef1234567890"
  }'
Import Devices from CSV via API
curl -X POST http://localhost:3000/api/devices/import/csv \
  -H "Authorization: Bearer ${TOKEN}" \
  -H "Content-Type: text/csv" \
  --data-binary @devices.csv
Import Devices from JSON via API
curl -X POST http://localhost:3000/api/devices/import/json \
  -H "Authorization: Bearer ${TOKEN}" \
  -H "Content-Type: application/json" \
  -d '[
    {
      "name": "spine-sw-01",
      "host": "10.4.0.1",
      "device_type": "arista_eos",
      "manufacturer": "Arista",
      "model": "7280R3",
      "site": "dc-north",
      "tags": ["spine", "fabric"]
    },
    {
      "name": "spine-sw-02",
      "host": "10.4.0.2",
      "device_type": "arista_eos",
      "manufacturer": "Arista",
      "model": "7280R3",
      "site": "dc-north",
      "tags": ["spine", "fabric"]
    }
  ]'
Device Fields Reference
| Field | Required | Default | Description |
|---|---|---|---|
name | Yes | — | Unique device identifier within the organization |
host | Yes | — | Management IP address or resolvable hostname |
device_type | Yes | — | Platform driver string (e.g., cisco_ios, juniper_junos) |
port | No | 22 | SSH port number |
protocol | No | ssh | Connection protocol |
manufacturer | No | — | Device vendor (Cisco, Juniper, Arista, etc.) |
model | No | — | Hardware model (ISR 4451, Nexus 9300, MX204, etc.) |
site | No | — | Physical site or location identifier |
serial_number | No | — | Hardware serial number |
asset_tag | No | — | Organization asset tracking tag |
tags | No | [] | Array of string tags for grouping and filtering |
default_credential_id | No | — | UUID of the credential in the vault |
description | No | — | Free-text description of the device |
Questions & Answers
- Q: How do I add a device to NetStacks?
- A: Navigate to Devices in the Admin UI and click Add Device. Enter the device name, management IP or hostname, select the device type (e.g.,
cisco_ios), and optionally assign a credential from the vault. Click Save to create the device record. You can also add devices in bulk via CSV import, JSON API, or NetBox sync. - Q: What fields are required when adding a device?
- A: Three fields are required:
name(a unique identifier),host(management IP address or hostname), anddevice_type(the platform driver string such ascisco_ios,juniper_junos, orarista_eos). The port defaults to 22 and the protocol defaults to SSH if not specified. - Q: How do I import devices from a CSV file?
- A: Create a CSV file with at least
name,host, anddevice_typecolumns. Navigate to Devices → Import → CSV Import, upload the file, review the preview, and click Import. Failed rows are reported with specific error messages (duplicate names, missing fields). You can also import via the REST API by posting the CSV content toPOST /api/devices/import/csvwith aContent-Type: text/csvheader. - Q: How do I import sessions from SecureCRT?
- A: In SecureCRT, export your session profiles via File → Export Settings. In NetStacks, go to Devices → Import → SecureCRT and upload the exported file. NetStacks maps session names to device names and hostnames to the host field. You will need to assign device types and credentials after import since SecureCRT does not store platform type information.
- Q: How are credentials associated with devices?
- A: Each device has an optional
default_credential_idfield that links to a credential stored in the encrypted vault. When NetStacks connects to the device for config collection, terminal sessions, or automation tasks, it retrieves and decrypts the credential on the fly. You can also specify a per-operation credential that overrides the device default. Credentials are never stored in the device record — only a UUID reference. - Q: Is there a maximum number of devices supported?
- A: There is no hard limit on the number of devices in the inventory. NetStacks is designed for enterprise environments managing hundreds to thousands of devices. Performance depends on your PostgreSQL instance and available memory. Organizations with 10,000+ devices should ensure adequate database resources and consider paginated API queries.
- Q: How do I test connectivity after adding a device?
- A: Select the device in the device list and click Test Connection. NetStacks attempts an SSH connection using the assigned credential and reports whether authentication succeeded, the device type was detected correctly, and the device responded to a basic command. Failed tests include detailed error messages to help troubleshoot.
Troubleshooting
Device won't connect after adding
If the device appears in the inventory but connection tests fail, check these common causes:
- Wrong credentials — Verify the assigned credential has the correct username and password or SSH key. Test the credential manually with
ssh admin@10.1.0.1from the Controller host. - Incorrect IP or hostname — Verify the host field points to the management interface, not a data-plane address.
- Firewall blocking SSH — Confirm the Controller can reach the device on the configured port. Run
nc -zv 10.1.0.1 22from the Controller host. - Wrong port — Some devices use non-standard SSH ports (e.g., 2222 for jump hosts). Update the port field accordingly.
CSV import fails with column errors
The CSV parser requires exact column names. Verify your header row uses lowercase field names: name, host, device_type, port, manufacturer, model, platform, site, description. Extra columns are ignored. Missing required columns cause the entire import to fail before processing rows.
Duplicate device name error
Device names must be unique within your organization. If a CSV import reports duplicate name errors, either rename the conflicting devices in the CSV or update the existing device record first. The API returns a specific error with the row number and duplicate name.
SecureCRT import does not detect device types
SecureCRT session files do not contain platform type information. After import, all devices default to generic. Navigate to each device and set the correct device type (e.g., cisco_ios, juniper_junos) for full platform-specific functionality.
Related Features
These features extend device management with platform awareness, integrations, and fleet-wide operations:
- Device Types — Supported platforms, auto-detection, and platform driver details
- NetBox Integration — Sync device inventory from NetBox instances automatically
- Credential Vault — Encrypted credential storage and device credential association
- Bulk Operations — Perform actions across multiple devices at once
- Config Snapshots — Capture and store device configurations for backup and comparison