NetBox Integration
Synchronize device inventory from one or more NetBox instances with filter-based device selection, field mapping, and scheduled sync.
Overview
NetStacks integrates with NetBox to import and synchronize device inventory. If your organization already uses NetBox as its network source of truth, this integration eliminates duplicate data entry — devices defined in NetBox flow automatically into NetStacks with their names, IPs, platform types, sites, and tags intact.
The integration supports multiple NetBox instances (e.g., production and lab environments), filter-based device selection to import only the devices you need, automatic periodic sync, and SSL certificate verification controls for self-signed NetBox deployments.
NetBox sync imports devices from NetBox into NetStacks. Changes made to devices in NetStacks (such as credential assignment or tag updates) do not push back to NetBox. NetBox remains your authoritative source for device inventory metadata.
How It Works
NetBox Sources
Each connection to a NetBox instance is configured as a NetBox source. A source stores the NetBox URL, API token, device filters, sync settings, and a default credential to assign to imported devices. You can create multiple sources to sync from different NetBox instances or to apply different filters to the same instance.
Sync Mechanism
When a sync runs, NetStacks queries the NetBox REST API at /api/dcim/devices/ with the configured filters. For each device returned:
- NetStacks checks if a device with the same
netbox_idalready exists in the inventory. - If the device exists, its fields are updated with the latest NetBox data (name, IP, site, platform, tags).
- If the device is new, a new device record is created with
sourceset tonetbox.
After sync completes, NetStacks records the result: devices added, updated, unchanged, and failed, along with the sync duration and any errors encountered.
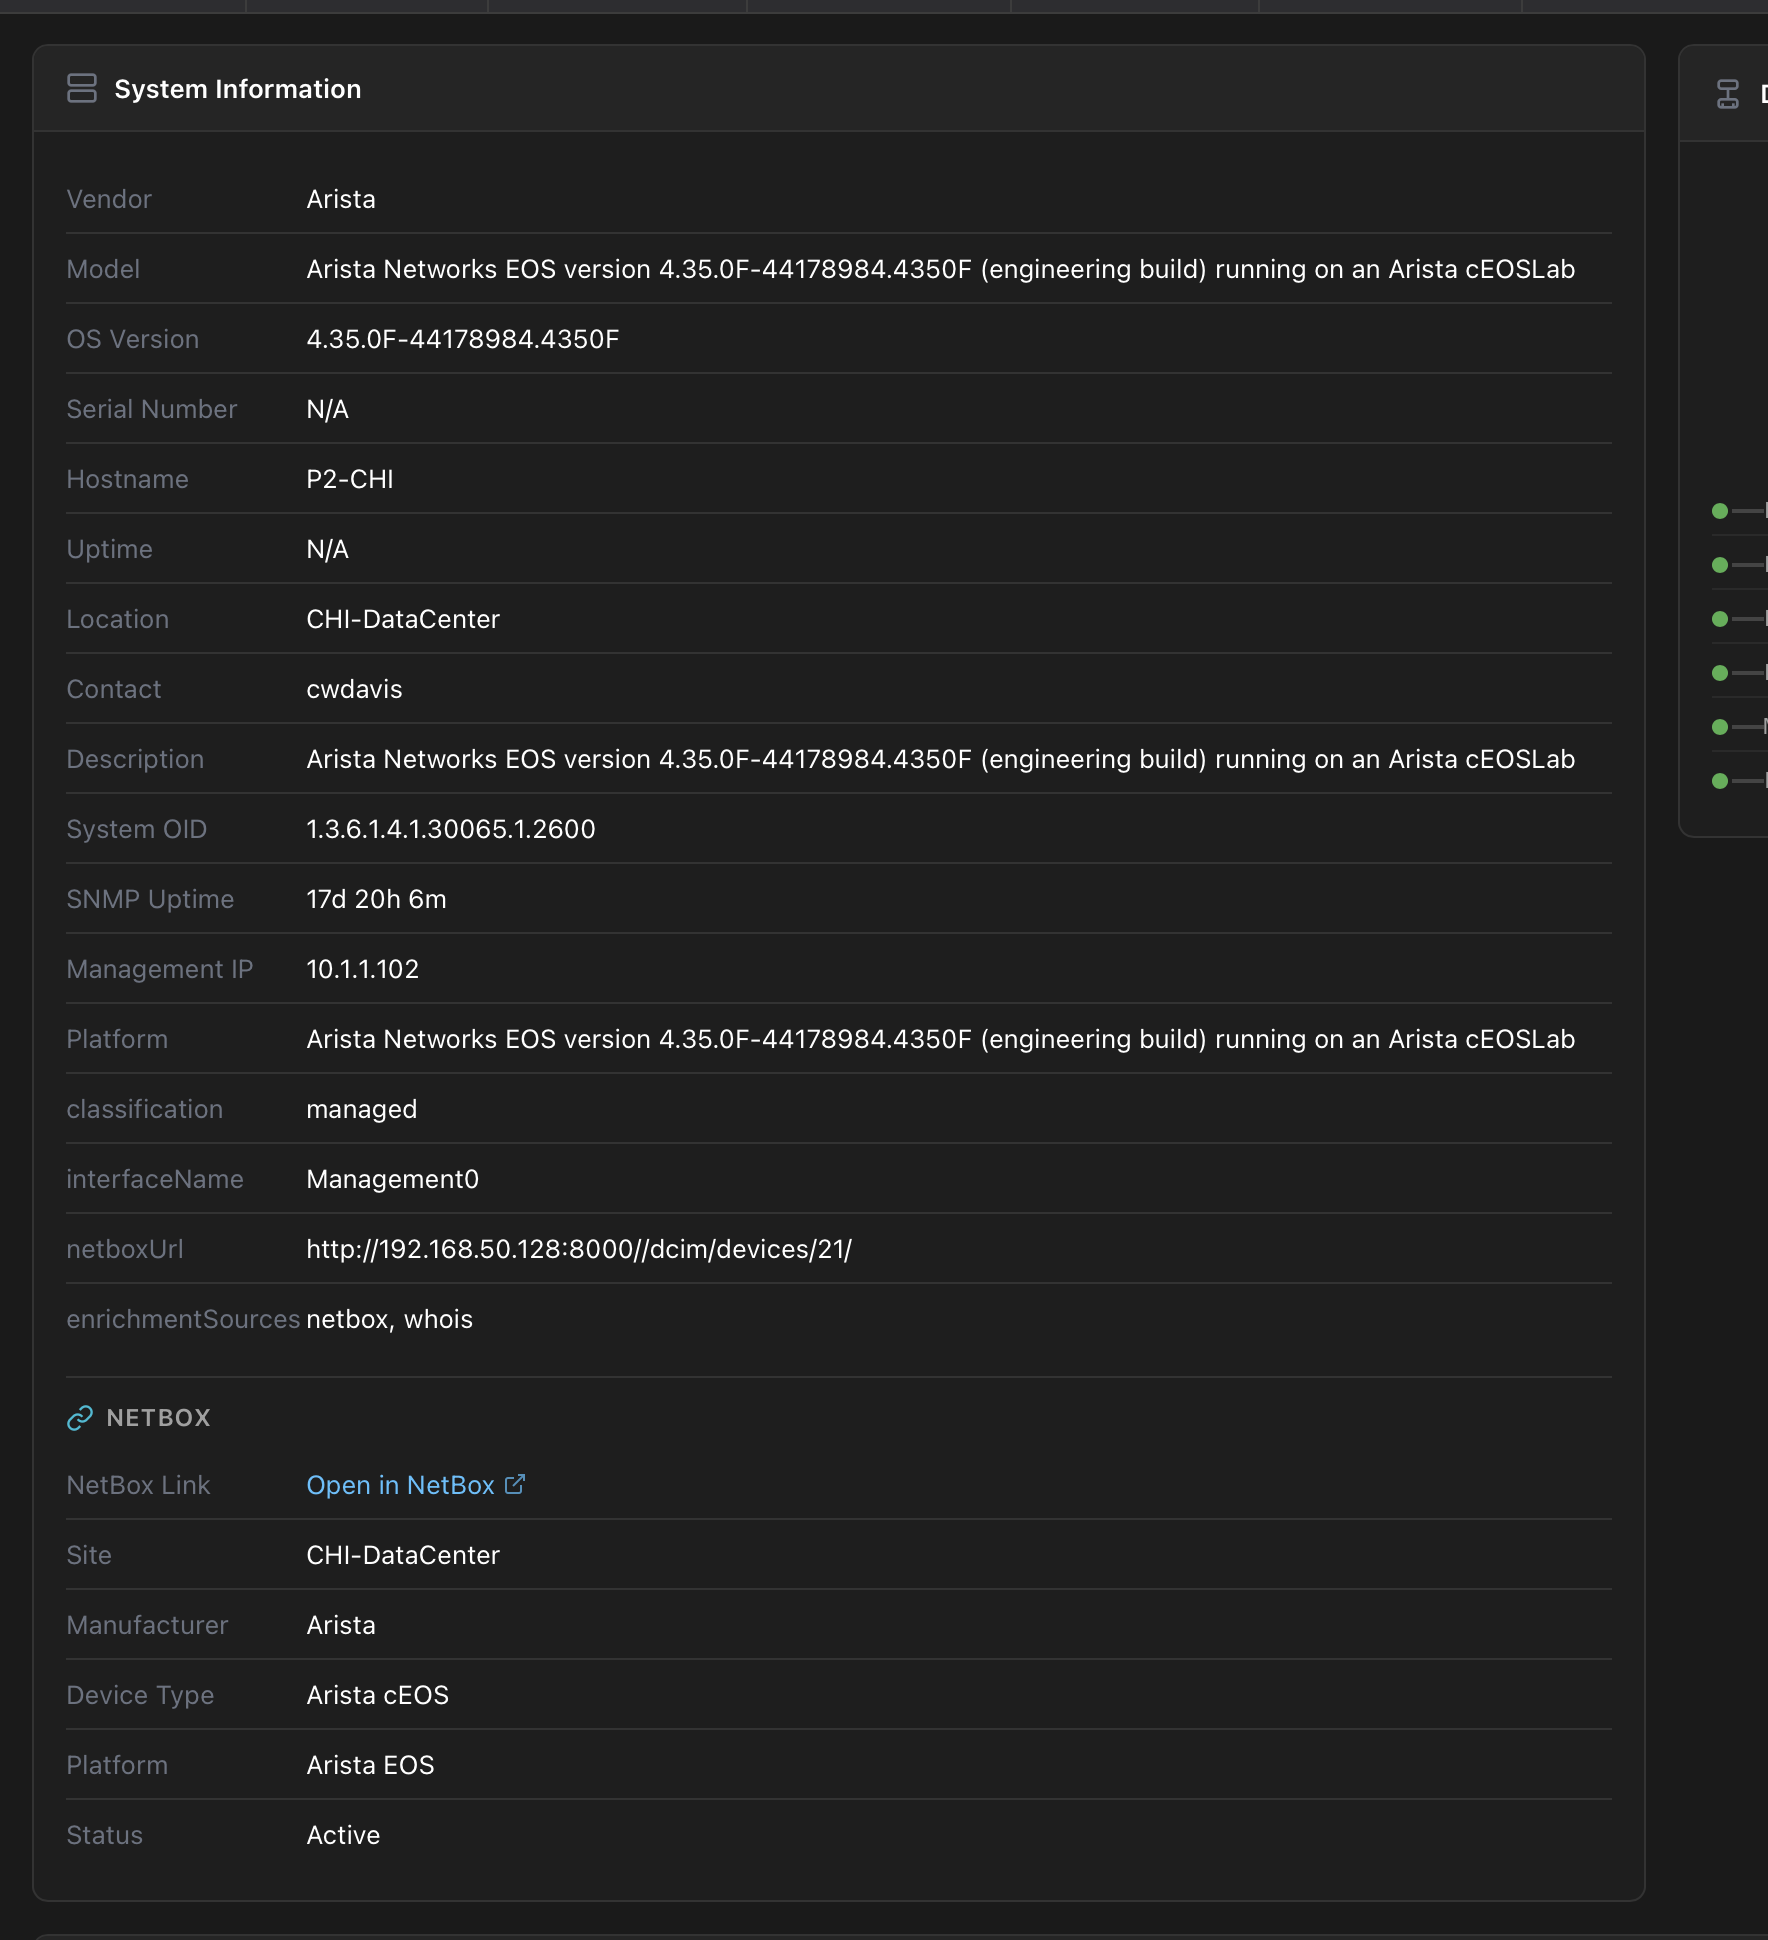
Devices imported from NetBox display enriched information in their detail panel, including a direct link back to the device in NetBox:
Field Mapping
| NetBox Field | NetStacks Field | Notes |
|---|---|---|
name | name | Device name, must be unique |
primary_ip.address | host | Primary IPv4 or IPv6 address (CIDR stripped) |
platform.slug | device_type | Mapped to NetStacks platform driver (e.g., cisco-ios → cisco_ios) |
site.name | site | Physical site location |
device_type.manufacturer.name | manufacturer | Hardware manufacturer |
device_type.model | model | Hardware model |
serial | serial_number | Device serial number |
asset_tag | asset_tag | Asset tracking identifier |
tags[].name | tags | Array of tag strings |
comments | description | Device comments become description |
id | netbox_id | Used for identifying devices during sync updates |
Device Filters
Each NetBox source can include filters to control which devices are imported. Available filter fields:
- site — Only import devices from a specific site (e.g.,
dc-east). - role — Filter by device role slug (e.g.,
router,switch,firewall). - manufacturer — Filter by manufacturer slug (e.g.,
cisco,juniper). - status — Filter by device status (e.g.,
active,planned,staged). - has_primary_ip — Only import devices that have a primary IP assigned (recommended, since devices without IPs cannot be connected to).
- tag — Only import devices that have a specific NetBox tag applied. Use the tag's slug value (e.g.,
managed,production). You can find tag slugs in NetBox under Organization → Tags. - limit — Maximum number of devices to import per sync.
- custom_filters — Arbitrary NetBox API query parameters for advanced filtering beyond the dedicated fields above. Specify filters as key=value pairs joined with
&(e.g.,region=us-east&tenant=acme). This lets you filter by any parameter the NetBox/api/dcim/devices/endpoint supports — includingregion,tenant,rack_id,platform, and any custom fields — without needing a dedicated filter field in NetStacks.
All filter fields are combined with AND logic. For example, setting site=dc-east, tag=managed, and custom_filters=tenant=acme imports only devices that are in the dc-east site AND tagged managed AND belong to the acme tenant.
Step-by-Step Guide
Step 1: Create an API Token in NetBox
- Log into your NetBox instance as an administrator.
- Navigate to Admin → API Tokens (or User Profile → API Tokens in NetBox 3.x).
- Click Add Token.
- Set the token permissions to read-only for the
dcimapp (devices, sites, platforms, manufacturers). - Copy the generated token value — you will need it in the next step.
Create a dedicated API token for NetStacks with read-only permissions. NetStacks never writes data back to NetBox, so write access is unnecessary and increases risk.
Step 2: Create a NetBox Source in NetStacks
- Navigate to Settings → Integrations → NetBox in the Admin UI.
- Click Add NetBox Source.
- Enter a Name for this source (e.g., "Production NetBox" or "Lab NetBox").
- Enter the URL of your NetBox instance (e.g.,
https://netbox.company.com). - Paste the API token from Step 1.
- If your NetBox uses a self-signed certificate, uncheck Verify SSL.
- Click Test Connection to verify the URL and token are valid. NetStacks queries the
/api/status/endpoint and reports the NetBox version. - Click Save.
Step 3: Configure Sync Filters
- Edit the NetBox source you just created.
- Under Device Filters, specify which devices to import. For example, set
site=dc-eastandstatus=activeto import only active devices at your east data center. - Enable has_primary_ip to skip devices without management IPs (they cannot be connected to).
- Optionally assign a Default Credential that will be linked to all imported devices.
- Click Save.
Step 4: Run Initial Sync
- On the NetBox source page, click Sync Now.
- NetStacks queries NetBox with your filters and imports matching devices.
- The sync result shows the number of devices added, updated, unchanged, and failed.
- Navigate to Devices to verify the imported devices appear with correct names, IPs, device types, and sites.
Step 5: Set Up Automatic Sync (Optional)
- Edit the NetBox source.
- Enable Auto Sync and set the Sync Interval in hours (e.g., 24 for daily sync).
- Click Save. NetStacks will automatically re-sync at the configured interval, importing new devices and updating existing ones.
Code Examples
Create a NetBox Source via API
curl -X POST http://localhost:3000/api/devices/sources/netbox \
  -H "Authorization: Bearer ${TOKEN}" \
  -H "Content-Type: application/json" \
  -d '{
    "name": "Production NetBox",
    "description": "Main production NetBox instance",
    "url": "https://netbox.company.com",
    "token": "nb-api-token-abc123def456ghi789",
    "verify_ssl": true,
    "auto_sync_enabled": true,
    "sync_interval_hours": 24,
    "default_credential_id": "a1b2c3d4-e5f6-7890-abcd-ef1234567890",
    "device_filters": {
      "site": "dc-east",
      "status": "active",
      "has_primary_ip": true,
      "role": "router",
      "tag": "managed",
      "custom_filters": "region=us-east&tenant=acme"
    }
  }'
Test NetBox Connection
# Test connection to a NetBox source
curl -X POST http://localhost:3000/api/devices/sources/netbox/${SOURCE_ID}/test \
  -H "Authorization: Bearer ${TOKEN}"

# Response:
# {
#   "success": true,
#   "message": "Connected to NetBox 3.7.1",
#   "device_count": 247
# }
Trigger Sync from a NetBox Source
# Trigger sync from a specific NetBox source
curl -X POST http://localhost:3000/api/devices/sources/netbox/${SOURCE_ID}/sync \
  -H "Authorization: Bearer ${TOKEN}"

# Response:
# {
#   "devices_added": 12,
#   "devices_updated": 35,
#   "devices_unchanged": 200,
#   "devices_failed": 0,
#   "sync_duration_ms": 4523
# }
Direct NetBox Sync (Without Source)
# One-off sync without creating a persistent source
curl -X POST http://localhost:3000/api/devices/sync/netbox \
  -H "Authorization: Bearer ${TOKEN}" \
  -H "Content-Type: application/json" \
  -d '{
    "netbox_url": "https://netbox-lab.company.com",
    "token": "nb-api-token-lab-xyz789",
    "filters": {
      "site": "lab-west",
      "manufacturer": "arista",
      "has_primary_ip": true,
      "limit": 50
    }
  }'
View Sync History
curl -s http://localhost:3000/api/devices/sync/history \
  -H "Authorization: Bearer ${TOKEN}" | jq '.[] | {
    netbox_url,
    devices_added,
    devices_updated,
    devices_failed,
    sync_duration_ms,
    sync_completed_at
  }'
Questions & Answers
- Q: How do I connect NetStacks to NetBox?
- A: Navigate to Settings → Integrations → NetBox and create a NetBox source with your NetBox URL and API token. The token needs read permissions on the
dcimapp. Click Test Connection to verify, then Sync Now to import devices. - Q: What fields sync from NetBox to NetStacks?
- A: NetStacks imports the device name, primary IP (as host), platform slug (as device type), site name, manufacturer, model, serial number, asset tag, tags, and comments (as description). The NetBox device ID is stored as
netbox_idfor future sync updates. Credentials are not synced — you must assign them in NetStacks. - Q: How often does sync run?
- A: Sync frequency is configurable per NetBox source. You can set an automatic sync interval in hours (e.g., every 6, 12, or 24 hours) or trigger manual syncs on demand via the UI or API. Disable auto-sync if you prefer manual control.
- Q: Can I sync from multiple NetBox instances?
- A: Yes. Create a separate NetBox source for each instance. Each source has its own URL, API token, device filters, and sync schedule. This is useful for organizations with separate NetBox deployments for production, staging, and lab environments.
- Q: What happens to manually added devices during sync?
- A: Manually added devices (with
sourceset tomanual) are not affected by NetBox sync. The sync process only creates or updates devices that have a matchingnetbox_id. Your manually added devices coexist alongside NetBox-synced devices without conflict. - Q: Does NetStacks push changes back to NetBox?
- A: No. The sync is one-directional — from NetBox into NetStacks. Changes you make to devices in NetStacks (credential assignment, tag updates, description edits) stay in NetStacks only. NetBox remains the authoritative source for inventory metadata.
- Q: What happens if a device is deleted from NetBox?
- A: Currently, NetStacks does not automatically delete devices that have been removed from NetBox. The device remains in the NetStacks inventory with its last-known data. You can periodically review devices with the
netboxsource tag and remove orphaned entries manually.
Troubleshooting
NetBox API connection fails
Verify the NetBox URL is reachable from the Controller host. Common issues:
- DNS resolution — Ensure the Controller can resolve the NetBox hostname. Try
curl -s https://netbox.company.com/api/status/from the Controller host. - Firewall rules — The Controller needs outbound HTTPS (port 443) access to the NetBox server.
- SSL certificate — If NetBox uses a self-signed or internal CA certificate, uncheck Verify SSL on the NetBox source, or install the CA certificate on the Controller host.
API token permission errors (403 Forbidden)
The NetBox API token must have read permissions on the following endpoints:
/api/dcim/devices//api/dcim/sites//api/dcim/platforms//api/dcim/manufacturers//api/status/(for connection testing)
Verify your token permissions in NetBox under Admin → API Tokens.
Devices import without IP addresses
NetStacks maps the NetBox primary_ip field to the device host. If devices are imported without a host value, they lack a primary IP in NetBox. Enable the has_primary_ip filter on your NetBox source to skip devices without assigned IPs.
Platform mapping mismatches
NetBox platform slugs are converted to NetStacks device type strings by replacing hyphens with underscores (e.g., cisco-ios becomes cisco_ios). If your NetBox uses non-standard platform slugs, you may need to update the imported devices' device types manually after sync.
Sync reports duplicate name errors
Device names must be unique in NetStacks. If a NetBox device has the same name as an existing manually-added device, the sync will report a failure for that device. Either rename the conflicting device in NetStacks or in NetBox before re-syncing.
Related Features
NetBox integration works alongside other device management features:
- Adding Devices — Manual and CSV import methods for devices not in NetBox
- Device Types — Platform driver strings that map from NetBox platform slugs
- Bulk Operations — Manage imported devices at scale with tags and folders
- Credential Vault — Assign credentials to NetBox-synced devices after import