AI Coding Tools (Claude Code, Aider and More)
Run Claude Code, Aider, OpenCode, KimiCode, a custom AI CLI, or the built-in NetStacks AI assistant inside a workspace.
Overview
Each workspace can start an AI coding tool in its terminal panel when it opens, already in the workspace folder. You edit and review files in the NetStacks editor while the tool works in the same folder.
Workspaces are available in the standalone desktop app only.
PATH before you open a workspace.Choose a Tool
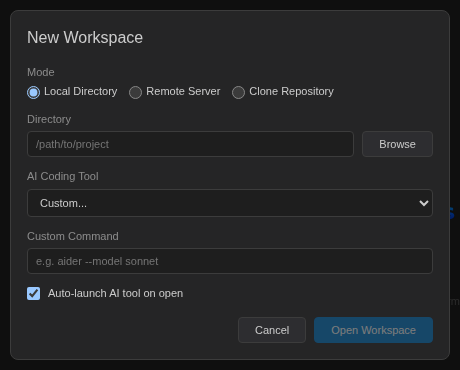
Pick the tool in the AI Coding Tool list of the New Workspace dialog. To change the default for new workspaces, go to Settings → Workspaces → Workspace Defaults.
| AI Coding Tool | Command typed in the terminal | Instructions file written |
|---|---|---|
| Claude Code | claude | CLAUDE.md |
| Aider | aider | CONVENTIONS.md |
| OpenCode | opencode | AGENTS.md |
| KimiCode | kimicode | AGENTS.md |
| Custom... | Whatever you enter in Custom Command | AGENTS.md |
| NetStacks Agent | None (built-in assistant panel) | None |
| None | None | None |
For the named tools you can add Launch Arguments, for example --continue. The dialog shows the full command underneath, such as cd <workspace> && clear && claude.
For any other CLI, choose Custom... and enter the whole command in Custom Command (for example aider --model sonnet).
How the Tool Is Launched
When Auto-launch AI tool on open is ticked, opening the workspace creates a terminal tab named after the tool (or AI CLI for a custom command). NetStacks starts a shell and types cd <workspace> && clear && <command> into it, the same as if you had typed it yourself.
- The tool runs as your user, with your shell environment and your existing logins and API keys for that tool.
- When you reopen a saved workspace, the AI tool tab is started again with the tool and arguments saved for that workspace.
- In a remote workspace, the shell runs on the remote server, so the tool must be installed there.
NetStacks Agent (Built-in Assistant)
Choose NetStacks Agent if you want the NetStacks AI assistant instead of an external CLI. The bottom panel of the workspace then shows the same AI assistant panel used elsewhere in the app, using the AI provider set in Settings → AI. Click ▼ (Collapse AI panel) to hide it.
The Instructions File
When a local workspace opens and the instructions file for your tool (see the table above) does not exist yet, NetStacks creates it in the workspace folder. It never overwrites an existing file.
The file tells the tool how to work inside NetStacks: how to open a file in the NetStacks editor, which language features are available, and some style rules. You can change the text that gets written in Settings → Prompts, under Workspace Init (seed file for AI coding tools).
.gitignore. NetStacks writes it again only if it is missing when the workspace opens.The Terminal Panel
The bottom panel can hold several terminal tabs. Each tab label starts with an icon: 🤖 AI tool, $ local shell, 🔗 SSH, 📡 Telnet.
- Click + to open a local shell in the workspace folder.
- Right-click the tab strip and choose Open session here… to open one of your saved SSH or Telnet sessions inside the workspace. Type to search by name or host, use the arrow keys, and press
Enter. - Python runs that use the NetStacks Engine stream to the Output tab. See Running files.
Letting the Tool Open Files
In a local workspace, an AI tool (or any script) can ask NetStacks to open a file in the editor by writing a small JSON file:
{"path": "/absolute/path/to/file.py"}NetStacks checks for this file every second, opens the file in an editor tab and then deletes the request. The default instructions file already explains this to the tool.
Giving the Tool Screenshots
Paste an image into the AI tool's terminal tab (Cmd/Ctrl+V) or drop an image file on it. NetStacks saves the image under .netstacks/screenshots/ and types the file path into the terminal, which tools like Claude Code can read. See Image Paste & Drop.
Troubleshooting
- "command not found" in the AI tab: the tool is not installed or not on the
PATHof your login shell. Install it, then open a new terminal tab or reopen the workspace. - The tool did not start: check that Auto-launch AI tool on open was ticked and the tool is not None. You can always start it by hand in a
$shell tab. - Wrong options: the tool and arguments are saved with each workspace when you create it. The values in Settings → Workspaces → Workspace Defaults only apply to workspaces you create afterwards. To change the tool for an existing workspace, remove it from the WORKSPACES list with × (your files are not touched) and create it again.